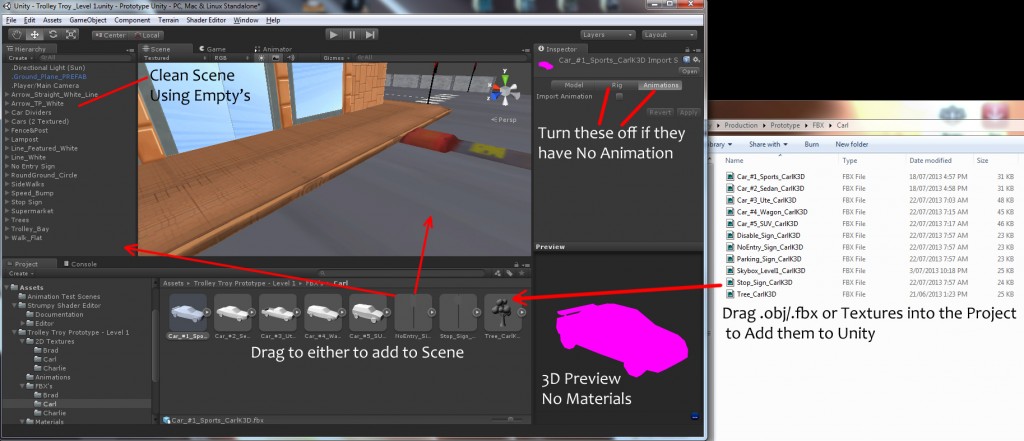
This Post will be a brief description of how to Create Assets (Project Browser) & Game Objects (Hierarchy). How to Import your own Assets & Textures. Then place them in the scene from the Project Browser.
Create: You can create a number of things to get your scene up and running the first of which is a Folder. Assets/ Create/ Folder (To rename thing simply select it then click once on the text to edit it). There are many things you can create some of which will need there own tutorial later on to fully understand such as Prefabs, Materials, Shaders, Animations, Animator Controllers or C#/JavaScript.
*Note: Anything you add from ‘Assets’ will appear in the Project Browser.
Under GameObject you can find ‘Create Empty’ This is a parent group by default with only Transform, however you can add components to it just like any other object in the scene but its best used as a Parent Group I find. Simply Rename it and Drag& Drop the Objects you want into this Group to Parent them. Other Handy GameObjects are Particle Systems, Different types of Lights & Cameras (If you need multiple, Unity will have 1 by default) all of which can be added directly to the scene.
*Note: Anything you add from ‘GameObject’ will appear in the Hierarchy.
Importing: Before Importingmake sure you have named your Model Accordingly in your 3D Program and Merged all parts that are not Animating.Importing or Adding Models or Textures is as easy as Drag & Drop from your desktop to the Project Browser. Unity Will Accept most File Types, I commonly use .fbx, .obj (Models), .tga, .png, .jpg (Texture). You can then use the Breadcrumb Trail Folder structure to move it where you want if its not already in its correct folder (as I’ve already discussed theres no Copy/Paste). When Importing a Model, .OBJ or .FBX by Default Unity will Include an Animation Type ‘Generic’ under Rig & Import Animation under Animations. Make sure to turn these Off if your object has no Animation or Rig Setup and Click Apply for each. For Textures you can compress your Texture to any size from 32×32 through to 4096×4096. This means you can work in what ever size you like and compress it later.
*Tip: I would recommend to delete any Materials That get imported with your models. You will be setting up Custom Materials Later on so there not needed and make the Project Browser Messy.
Implementing: Placing your Models into the Game Scene is as simple as Drag & Drop (Like normal) Into the Scene or Hierarchy. The Difference is Placing in the Hierarchy will place your model at a default 0,0,0 position within the scene depending on wheres it located in your 3D Program. But by placing it in the scene you’ll be able to control where you want it roughly.
*Tip: Selecting an Object & Pressing V will allow you to select any Point (Vertice) on the Model and Snap it to and other Point in the scene. This is great for snapping Modular pieces or placing new Models near the main scene if there far away.
![Importing Unity Importing Unity]()
