Strumpy Shader Editor by Strumpy Games is a Visual Shader Creation Package. Its Completely Free to download & use. You can download it from the Asset Store or Direct Download from the Unity Forums.
What is a Shader? Shaders control what type of Map the a Material can Intput & display such as Diffuse, Normal + Detail, Spec (Power/ Sharpness), Emissive, Cubemap, Rimlight & Alpha Transparency. This Tutorial will cover all the above and more.
When Beginning a new Shader I like to break it down into what individual Parts I want the shader to do. For a basic game Shader you’d use Diffuse, Normal & Specular. For a more complex shader such as a Glass Shader you’d Add Transparency through the Diffuse Alpha. It’s always better performance wise to keep your shader as simple as possible and use multiple shaders needed for a certain type of material. However some things must be sacrificed in order to do this. Eg. A shader using Diffuse + Alpha Transparency needs to have the Specular in a separate channel. However If you don’t need Transparency you can apply your Specular through your Diffuse Alpha.
For the Purposes of this Tutorial I’ll go through creating a Complex Shader that will give you can Idea of what can be done and you’ll be able to Optimize later to create any shader you wish.
Navigating Strumpy Shader: Install it like a normal Package, this will add Shader Editor to the top Bar/ Strumpy Shader Editor. A save shader Error will appear, Ignore it. when opening Strumpy your given Node Graph & Preview. To move around use Alt + Left Mouse. To connect nodes left Click the connection box to another, to Remove Right click on the Line. To move nodes select them once to highlight and drag to move them around.
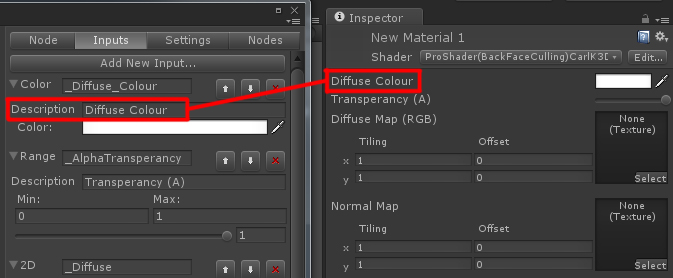
Setting up a new Shader: Your given a basic starter Shader when you open Strumpy. In the Right go to File/ New Graph. You have a Master Node that controls all your Connections for your nodes. You can add a new Node under the “Node” tab (4th Top Tab) or by right clicking in the graph. Some Import Nodes are Tex2D, Sampler2D, Add, Multiply, Range & Float. You can Name each Input under the Input Tab (2nd Tab)/ Description, This means it will display with that name when you save the Shader.
![Naming_Strumpy Naming_Strumpy]() Diffuse, Normal & Spec: To setup Diffuse, Normal & Spec you need a Tex2D (This is the Connection Node for the RGBA + A) & Sampler2D (Direct Connection of 2D Texture). you can multiply a Color with the Diffuse to act as an Override by using a Multiply & a Color Node. Normal Maps Connect to the “Normal” in the master Node. Use a UnpackNormal Node, Tex2DNormal & Sampler2D. Specular is done the same way as Diffuse but is plugged into the “Specular” Channel of the master node. I’ve also Added a Spec Shineness so I’ve used an Add to “Add” the Spec Color Override to the Specular then Multiply the Texture with the Shininess. Refer to the below Image.
Diffuse, Normal & Spec: To setup Diffuse, Normal & Spec you need a Tex2D (This is the Connection Node for the RGBA + A) & Sampler2D (Direct Connection of 2D Texture). you can multiply a Color with the Diffuse to act as an Override by using a Multiply & a Color Node. Normal Maps Connect to the “Normal” in the master Node. Use a UnpackNormal Node, Tex2DNormal & Sampler2D. Specular is done the same way as Diffuse but is plugged into the “Specular” Channel of the master node. I’ve also Added a Spec Shineness so I’ve used an Add to “Add” the Spec Color Override to the Specular then Multiply the Texture with the Shininess. Refer to the below Image.
![Strumpy #1 Strumpy #1]() *Note: Anything in Red Requires fixing before you can save the Shader out.
Emmisive, Cube Map, Normal Map Detail&Rim Light: These are most of the Additional features that can be added to a shader If need be. Emmisive creates a self Illuminated effect that can be used for faking Lights. This is plugged into the Emission node. Cube Map uses a Texture as a reflection in an Object (I might go through setting up Cube Maps in a later Post). This is done with a TexCUBE, SamplerCube & SimpleWorldReflection Node much like the Normal Map. Normal Map Detail is Exactly the same as the Normal Map, the reason I call it Detail is because this is used as a High detail Normal Map, when you get close to the object Eg. Brick, the Detail Normal appears. This is the Normal Map Tiled a Number of times Eg. 10x. Rim Light is exactly what it sounds like, It adds a Light around the Rim of the Object. This is done using a Power, Fresnel, ViewDirection & Range (Controls the Strength).
Alpha Transparency: setting up Transparency is done using a Multiply from the Alpha Master Node. and connecting Arg1 (Argument 1) to A (In Tex2D) & a Range in Arg2. This will allow you to use a Alpha Channel in your Diffuse for Transparency. However If you have an Object with Opaque and Transparency This could have Alpha sorting Problems (Solid Objects will appear in front or behind Transparent object).
Cutout Transparency is done connecting Clip – Subtract (Alg1) – Range & (Alg2) – Tex2D (A) in the Diffuse. Only settings that need changing are Queue Settings need to be set to Transparent.
*Note: Anything in Red Requires fixing before you can save the Shader out.
Emmisive, Cube Map, Normal Map Detail&Rim Light: These are most of the Additional features that can be added to a shader If need be. Emmisive creates a self Illuminated effect that can be used for faking Lights. This is plugged into the Emission node. Cube Map uses a Texture as a reflection in an Object (I might go through setting up Cube Maps in a later Post). This is done with a TexCUBE, SamplerCube & SimpleWorldReflection Node much like the Normal Map. Normal Map Detail is Exactly the same as the Normal Map, the reason I call it Detail is because this is used as a High detail Normal Map, when you get close to the object Eg. Brick, the Detail Normal appears. This is the Normal Map Tiled a Number of times Eg. 10x. Rim Light is exactly what it sounds like, It adds a Light around the Rim of the Object. This is done using a Power, Fresnel, ViewDirection & Range (Controls the Strength).
Alpha Transparency: setting up Transparency is done using a Multiply from the Alpha Master Node. and connecting Arg1 (Argument 1) to A (In Tex2D) & a Range in Arg2. This will allow you to use a Alpha Channel in your Diffuse for Transparency. However If you have an Object with Opaque and Transparency This could have Alpha sorting Problems (Solid Objects will appear in front or behind Transparent object).
Cutout Transparency is done connecting Clip – Subtract (Alg1) – Range & (Alg2) – Tex2D (A) in the Diffuse. Only settings that need changing are Queue Settings need to be set to Transparent.
![Cutout_Strumpy Cutout_Strumpy]() These are just a basic summery of what each part does and what they use. After a while of using Strumpy you will begin to understand exactly what each Node is doing.
BackFace Culling: is only render the face of an object in the direction of its Normals. This is good for Objects like a Building or a Tree. Having No BackFace culling will render both sides which uses a little more performance then having backface culling but its not noticeable. Having no BackFace Culling is good for Glass or 2D Geometry. to Turn No/Off Culling go to the Settings Tab/ Culling and Depth Settings/ CullMode/ Back (BackFace), Front or Off.
These are just a basic summery of what each part does and what they use. After a while of using Strumpy you will begin to understand exactly what each Node is doing.
BackFace Culling: is only render the face of an object in the direction of its Normals. This is good for Objects like a Building or a Tree. Having No BackFace culling will render both sides which uses a little more performance then having backface culling but its not noticeable. Having no BackFace Culling is good for Glass or 2D Geometry. to Turn No/Off Culling go to the Settings Tab/ Culling and Depth Settings/ CullMode/ Back (BackFace), Front or Off.
![Settings Strumpy Settings Strumpy]() Settings: The Settings Tab is where you Name what your Shader will appear as In Unity. there are a number of settings such as Color, Lighting, Blending, Culling & Fog. Part of setting up Transparency for correct Cutout Transparency is done here as well as BackFace Culling.
Settings: The Settings Tab is where you Name what your Shader will appear as In Unity. there are a number of settings such as Color, Lighting, Blending, Culling & Fog. Part of setting up Transparency for correct Cutout Transparency is done here as well as BackFace Culling.
![Strumpy Reference Image Strumpy Reference Image]() Reference Shader Setup Image.
Reference Shader Setup Image.
 Diffuse, Normal & Spec: To setup Diffuse, Normal & Spec you need a Tex2D (This is the Connection Node for the RGBA + A) & Sampler2D (Direct Connection of 2D Texture). you can multiply a Color with the Diffuse to act as an Override by using a Multiply & a Color Node. Normal Maps Connect to the “Normal” in the master Node. Use a UnpackNormal Node, Tex2DNormal & Sampler2D. Specular is done the same way as Diffuse but is plugged into the “Specular” Channel of the master node. I’ve also Added a Spec Shineness so I’ve used an Add to “Add” the Spec Color Override to the Specular then Multiply the Texture with the Shininess. Refer to the below Image.
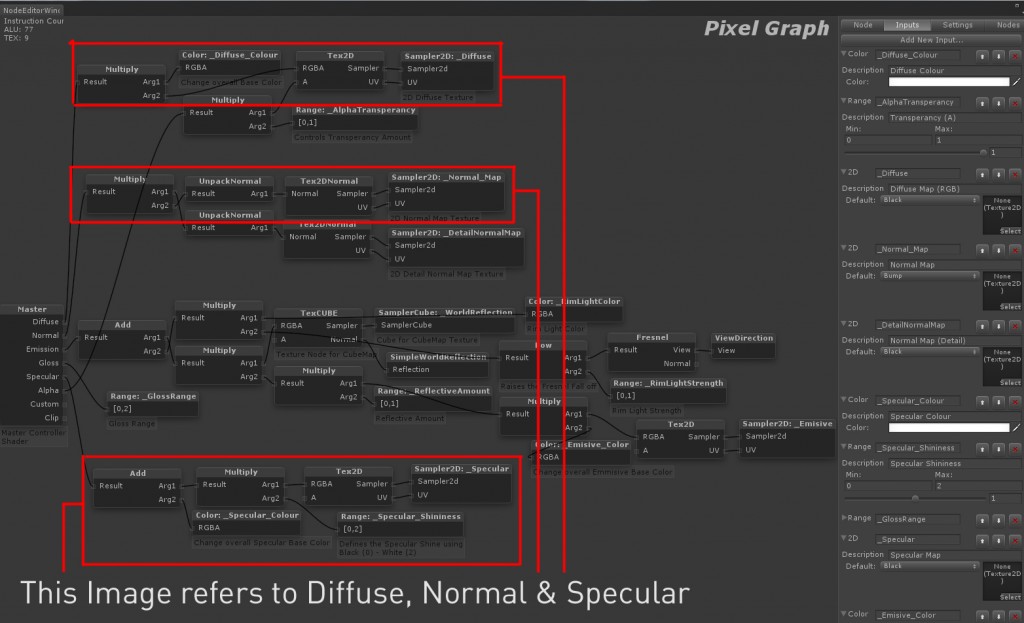 *Note: Anything in Red Requires fixing before you can save the Shader out.
Emmisive, Cube Map, Normal Map Detail&Rim Light: These are most of the Additional features that can be added to a shader If need be. Emmisive creates a self Illuminated effect that can be used for faking Lights. This is plugged into the Emission node. Cube Map uses a Texture as a reflection in an Object (I might go through setting up Cube Maps in a later Post). This is done with a TexCUBE, SamplerCube & SimpleWorldReflection Node much like the Normal Map. Normal Map Detail is Exactly the same as the Normal Map, the reason I call it Detail is because this is used as a High detail Normal Map, when you get close to the object Eg. Brick, the Detail Normal appears. This is the Normal Map Tiled a Number of times Eg. 10x. Rim Light is exactly what it sounds like, It adds a Light around the Rim of the Object. This is done using a Power, Fresnel, ViewDirection & Range (Controls the Strength).
Alpha Transparency: setting up Transparency is done using a Multiply from the Alpha Master Node. and connecting Arg1 (Argument 1) to A (In Tex2D) & a Range in Arg2. This will allow you to use a Alpha Channel in your Diffuse for Transparency. However If you have an Object with Opaque and Transparency This could have Alpha sorting Problems (Solid Objects will appear in front or behind Transparent object).
Cutout Transparency is done connecting Clip – Subtract (Alg1) – Range & (Alg2) – Tex2D (A) in the Diffuse. Only settings that need changing are Queue Settings need to be set to Transparent.
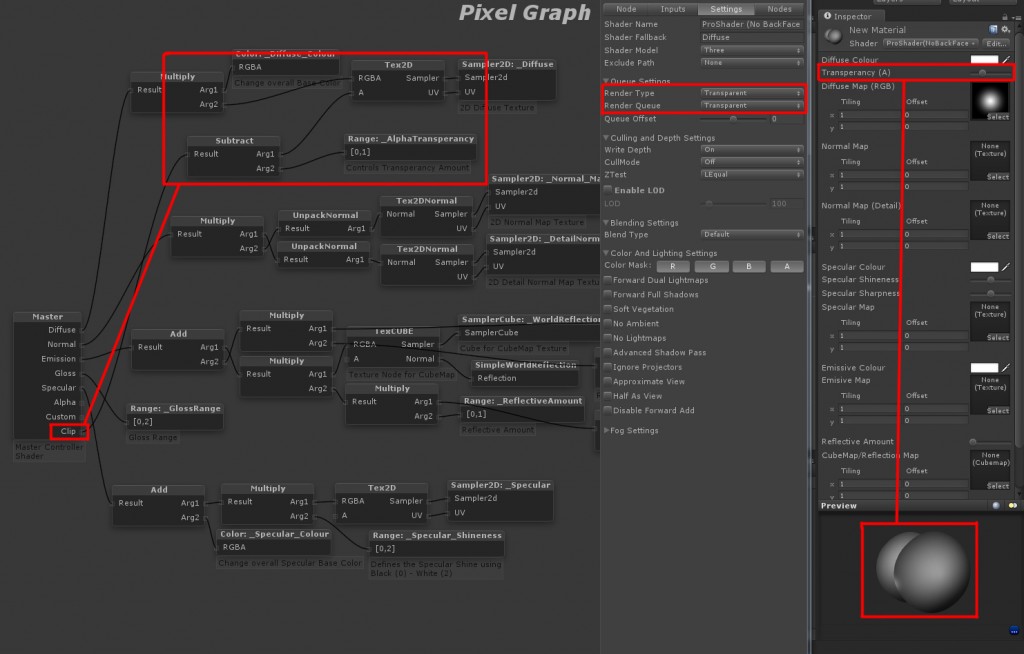 These are just a basic summery of what each part does and what they use. After a while of using Strumpy you will begin to understand exactly what each Node is doing.
BackFace Culling: is only render the face of an object in the direction of its Normals. This is good for Objects like a Building or a Tree. Having No BackFace culling will render both sides which uses a little more performance then having backface culling but its not noticeable. Having no BackFace Culling is good for Glass or 2D Geometry. to Turn No/Off Culling go to the Settings Tab/ Culling and Depth Settings/ CullMode/ Back (BackFace), Front or Off.
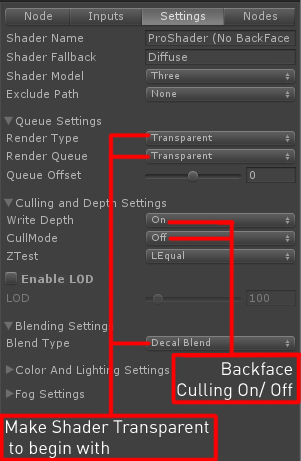 Settings: The Settings Tab is where you Name what your Shader will appear as In Unity. there are a number of settings such as Color, Lighting, Blending, Culling & Fog. Part of setting up Transparency for correct Cutout Transparency is done here as well as BackFace Culling.
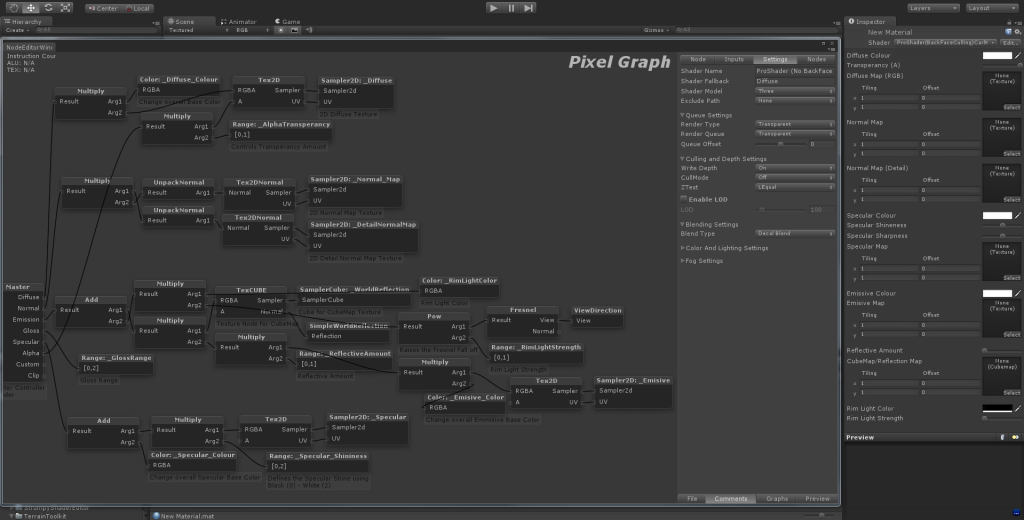 Reference Shader Setup Image.