Now that you have a basic understanding of Unity, How to use it, Setup Scenes & Use Prefabs & Materials. I Want to get into a few different Addons & Features Unity has to offer. A good start for this is GUI (Graphic User Interface) & UI (User Interface). In the Past most of this would be set out by a programmer but NGUI gives control back to the Artist by allowing you to create your own GUI & UI and set it up in unity as well as get it working with pre-existing Scripts for basic things such as Buttons, Sliders, Sprites, Check-box & Much more.
There are 2 versions for nGUI. Free (Contains a Watermark for a few seconds) or Full (Costs $95). I use the Free Version.
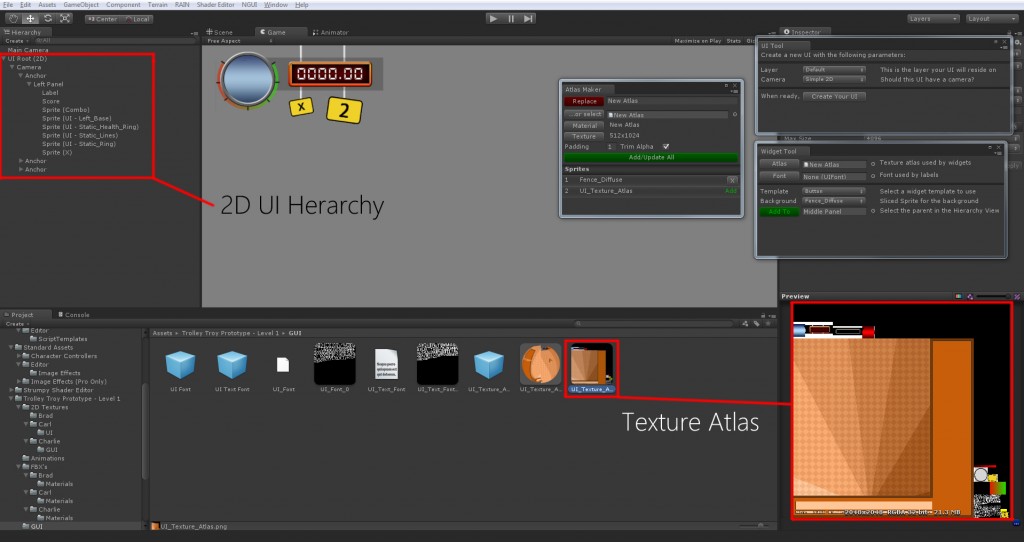
Create GUI/ UI: Once you have downloaded the nGUI Package Free Version Here, Simply Open it. This will add a Tab up the top of Unity called “NGUI”. To Create a New GUI go to NGUI/ Create New UI. Set your desired type of Camera, 2D Locked to X & Y or 3D X, Y, Z. Select a Layer (It’s a good Idea to create a new Layer for GUI or UI. To Create a New Layer go to Layers (Button, Right side of screen)/ Edit Layers/ User Layer 8, 9….. Type a Name for the New Layer Like “GUI”, What this will do is Make your UI Camera Only render Objects on that Layer. with this you can Make the Layer all Unlit & Follow the Camera. Once that is done select Create Your UI.
*Note: All of these new Windows can be re-positioned anywhere you want. Very Handy!
Create an Atlas: An Atlas or “Texture Atlas” is a Collection of 2D Textures all compiled into 1 Texture Map. for example: 4x 256 Texture Maps would use 4 Draw Calls. If you makes these Textures into a Atlas this will put them all together in 1x 512 Map & use 1 Draw Call. However this Atlas Maker is only for NGUI and will work in conjunction with NGUI Widgets (More on them Bellow).
To Create a Atlas go to NGUI/ Atlas Maker. Name your new Atlas or select a existing one if you have one. At this point you can create the Atlas. This will make a Shader & Material for the Atlas and a Prefab for all Widgets to use this Prefab.
To Add Texture to the Atlas, Select your Texture and it will appear in the Atlas Maker under Sprites, Click Add/Update All. You can select as many Textures as you want, just remember the more textures you add the bigger the Texture size will get. You will see this in the Preview Window.
Create UI Widget: A “Widget” is what will populate the UI such as Sprites, Buttons etc. To create one go to NGUI/ Create a Widget/ This is where all your Creation will occur. Most Widgets here will reference the Atlas as a Sprite so this will list all your Textures in your Atlas for your current selected Atlas.
Clicking the Atlas Button will show all your Atlas you’ve created. If you have created a Font or Have one to use you can select it under the Font Button (Font Creation will be covered in next Tutorial). You can then Select your Template. Once you have done this click Add to Panel (Or select where you want it to go). In the Heirarchy you will have The UI Structure (Type), Camera its locked to, and a Panel. Widgets are placed in the Panel, Scripts applied to the Widgets are in the Inspector.
Experimentation here is key to learning what you like and what you can do.
Credits go to Brendan Bottomley for Teaching me.
![nGUI Unity nGUI Unity]()
